 Pin It
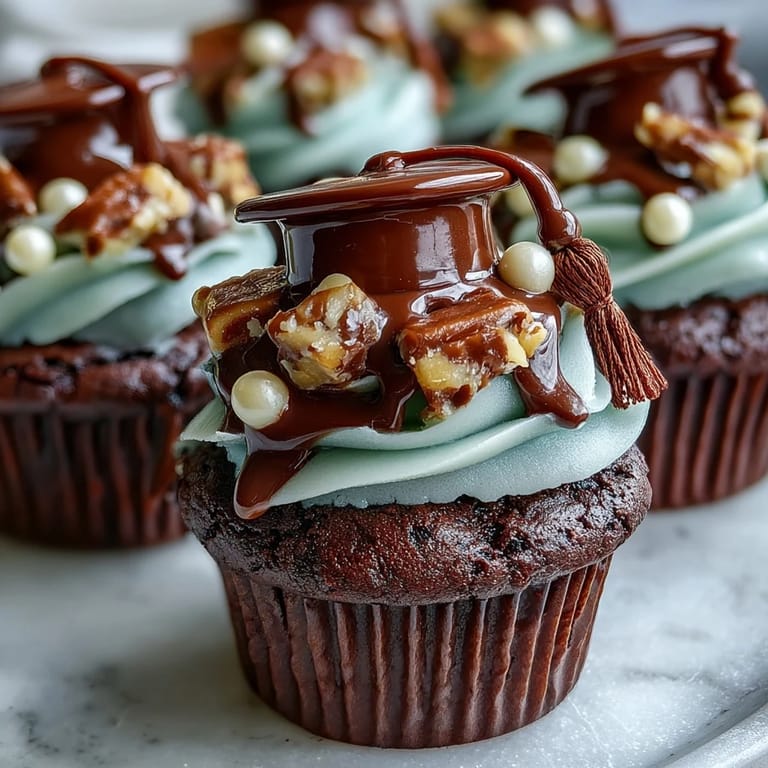
 My cousin texted me three weeks before her graduation asking if I could make something special for her party, and I immediately thought of cupcakes with tiny graduation caps on top. I'd seen them online but never attempted the toppers myself, so I spent an afternoon experimenting with candy and chocolate until I got the proportions right. When I finally nailed it—that perfect balance of a chocolate square base, peanut butter cup mortarboard, and licorice tassel—I knew I'd found something that would make any celebration feel genuinely festive without requiring pastry school skills.
I'll never forget watching my cousin's face light up when she saw the cupcakes lined up on the dessert table—she immediately picked one up to examine the tiny cap, and half her friends started taking photos before eating them. That's when I realized these weren't just a dessert; they were a way of saying you showed up for someone important on their big day, and you cared enough to make it memorable.
Ingredients
- All-purpose flour: The foundation of your cupcakes, and measuring by weight rather than volume will give you more consistent results every single time.
- Granulated sugar: This sweetens the batter while the creaming process with butter incorporates air that makes the crumb tender.
- Unsalted butter: Use softened butter so it creams smoothly with the sugar, and the unsalted variety lets you control the salt level.
- Large eggs: Room temperature eggs blend more evenly into the batter and create a better structure.
- Whole milk: This adds moisture and creates a more tender crumb than using water alone.
- Baking powder: Essential for lift; make sure yours is fresh because old baking powder loses its oomph.
- Salt: A small pinch balances the sweetness and enhances the vanilla flavor.
- Pure vanilla extract: Skip the imitation stuff—the real thing makes a noticeable difference in taste.
- Powdered sugar: Sifting it before adding prevents lumps in your frosting and creates that cloud-like texture.
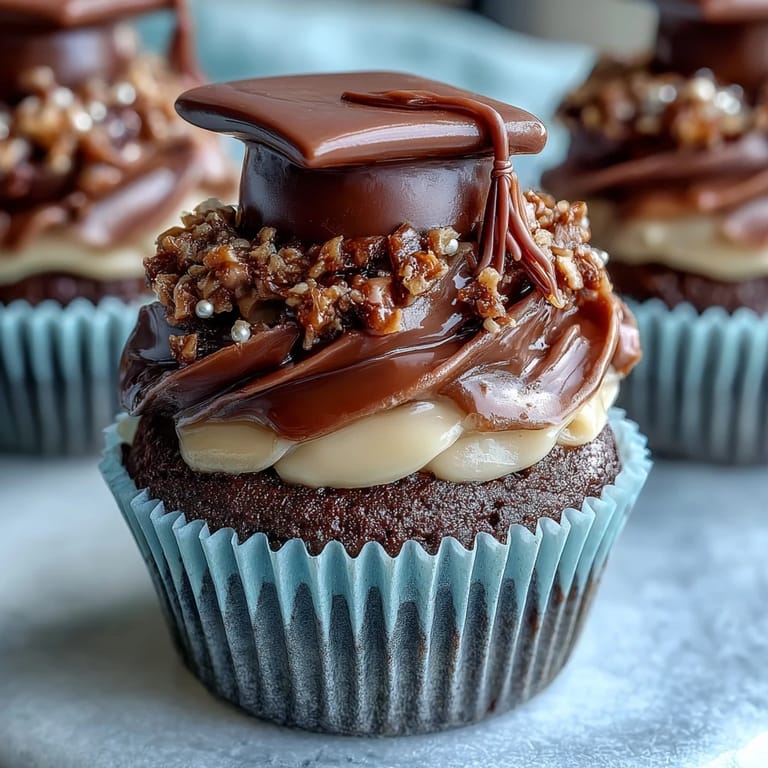
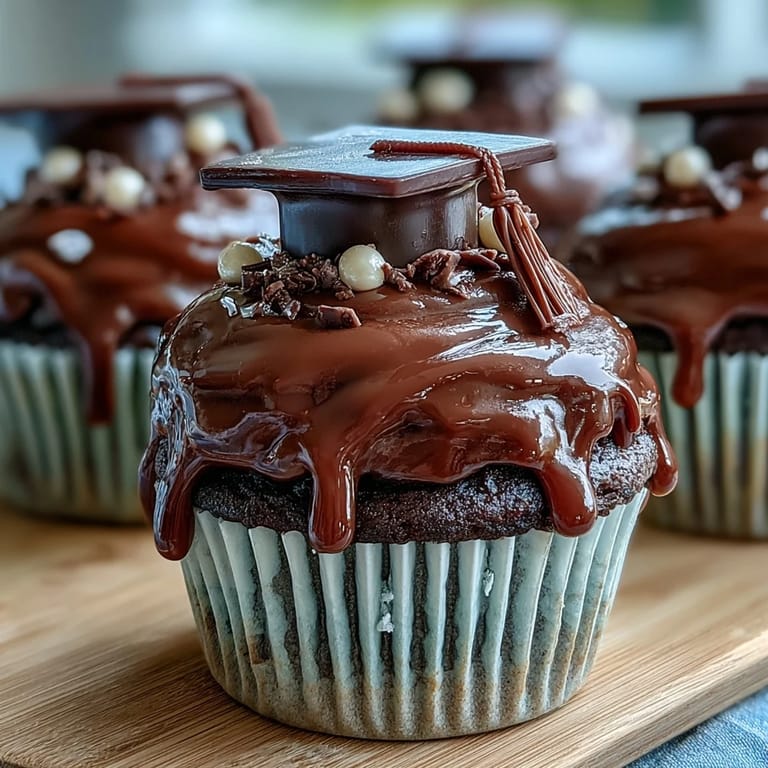
- Mini peanut butter cups: These become your mortarboard, the flat topped part of the graduation cap, and they add a delicious flavor dimension.
- Chocolate square candies: The base of each cap topper; Ghirardelli or similar quality brands hold their shape better during assembly.
- String licorice or sour candy strips: These create the tassel that hangs from the cap and add a pop of color.
- Mini M&Ms or candy pearls: The final accent that looks like a button on the mortarboard and catches light beautifully.
- Melted chocolate or frosting: This acts as your edible glue to hold all the topper pieces together.
Tired of Takeout? 🥡
Get 10 meals you can make faster than delivery arrives. Seriously.
One email. No spam. Unsubscribe anytime.
Instructions
- Prepare your workspace:
- Preheat your oven to 350°F and line your muffin tin with paper liners—this small step prevents sticking and makes cleanup easier than you'd expect.
- Cream the butter and sugar:
- Beat the softened butter and sugar together until it looks pale and fluffy, which usually takes about two to three minutes with an electric mixer. You're incorporating tiny air bubbles that will make your cupcakes light and tender.
- Add eggs one at a time:
- Beat each egg in fully before adding the next one, then stir in your vanilla extract so every bite has that warm vanilla flavor throughout.
- Combine dry ingredients:
- In a separate bowl, whisk together your flour, baking powder, and salt so the leavening agent distributes evenly.
- Alternate wet and dry:
- Add half the dry mixture, mix gently, then pour in the milk, and finish with the remaining dry ingredients, mixing just until you don't see streaks of flour. Overmixing develops gluten and makes cupcakes tough.
- Fill and bake:
- Divide the batter evenly among liners—an ice cream scoop works beautifully for this—and bake for eighteen to twenty minutes until a toothpick inserted in the center comes out clean. The tops should feel springy when you touch them lightly.
- Cool completely:
- Let the cupcakes cool in the pan for five minutes, then turn them out onto a wire rack and wait until they're completely cool before frosting, or the frosting will melt into puddles.
- Make the buttercream:
- Beat softened butter until it's completely smooth, then gradually add your sifted powdered sugar while mixing, which prevents lumps and creates a silky texture. Add milk, vanilla, and salt, then beat until fluffy and spreadable.
- Frost with intention:
- Pipe or spread frosting onto each cooled cupcake in a swirl or dome shape that looks inviting and gives the cap toppers a stable surface to sit on.
- Assemble the caps:
- Lay a chocolate square flat-side up, use a dab of melted chocolate or frosting to stick a mini peanut butter cup upside-down in the center, attach your licorice tassel to one side, and top with an M&M or pearl as the button. Let everything set before placing caps on cupcakes.
- Final placement:
- Gently press each cap onto a frosted cupcake, and watch your creation transform into something that looks almost too pretty to eat.
 Pin It
 There was a quiet moment during the party when I watched someone carefully photograph each cupcake before eating it, and I realized that sometimes the most meaningful gifts aren't expensive or complicated—they're just made with attention and care. These little cakes became keepsakes in people's memories, which is exactly what celebration food should do.
Customizing Your Cupcakes for School Colors
One of the smartest moves you can make is tinting your buttercream frosting to match the graduating student's school colors, which takes seconds but makes the entire display feel personally tailored. Add food coloring a tiny drop at a time and mix thoroughly, because it's much easier to go darker than to lighten up if you add too much. You can also choose licorice and candy colors that coordinate with your frosting, creating a cohesive look that photographs beautifully and shows genuine thoughtfulness.
Storage and Make-Ahead Strategies
I've found that these cupcakes actually taste better the day after you make them because the flavors have time to settle and the crumb stays incredibly moist when stored properly. Keep unfrosted cupcakes in an airtight container at room temperature for up to three days, and you can even freeze them for up to two weeks if you want to bake ahead. The frosting keeps for three days refrigerated, and the cap toppers can be assembled the night before and stored in a cool, dry place, which means you're really just doing final assembly on party day.
Allergy Considerations and Substitutions
Since graduation parties typically include guests with all kinds of dietary needs, checking every candy label is non-negotiable if you're serving to people with nut allergies, because some manufacturers use shared equipment. You can absolutely swap peanut butter cups for regular chocolate squares to make the whole batch nut-free, and honestly, it looks just as charming. Keep a list of which toppers contain what allergens visible at your party so guests can make safe choices, and consider making a small batch of plain frosted cupcakes without the decorative caps for anyone with candy allergies.
- Always read candy labels twice because ingredients can change between manufacturers and even different batches.
- If serving a large group, you might want to bake a few extra plain cupcakes without toppers just in case someone has an unexpected allergy.
- Food coloring is typically dairy-free and gluten-free, but double-check if you're accommodating multiple dietary restrictions.
 Pin It
 These cupcakes are more than just a recipe; they're a way to celebrate someone's achievement and show up for them in a way that feels personal and homemade. Make them with joy, and they'll taste like you care.
Recipe FAQs
- → What ingredients create the edible cap toppers?
The caps are assembled using mini peanut butter cups or chocolate squares, licorice strips for tassels, and mini candy pearls for buttons, held together with melted chocolate or frosting.
- → Can the frosting be customized for school colors?
Yes, food coloring can be added to the buttercream frosting to match your desired colors.
- → How long do these cupcakes stay fresh?
Store in an airtight container at room temperature for up to two days to maintain freshness.
- → Is there a nut-free option for the toppers?
For nut allergies, use chocolate squares instead of peanut butter cups when making the cap toppers.
- → What is the baking time for the cupcakes?
Bake the cupcakes for 18 to 20 minutes until a toothpick inserted comes out clean.
- → What utensils are needed for preparation?
You'll need a muffin tin, paper liners, mixing bowls, an electric mixer, a spatula, and a piping bag or spoon for frosting.